Jan 232009
 

This years version of our Lotusphere session: “The Great Code Giveaway”: The Art of the Possible, is now available for download at download.snapps.com.

Prerequisite:

This application needs to run on a Domino server version 7.0.2 or above. Some Widgets may need version 8.5 or above to run.

This application uses The Dojo Toolkit JavaScript library.
The following is only needed, but required, if you are installing this application on a version of Domino below 8.5.

  1. Download version 1.1.1 or above of Dojo
  2. Unzip the download
  3. Rename and place this directory on your Domino server in the following path:
    path_to_root_data_directory/domino/html/domjs/dojo-1.1.1

This path is hard coded into the MyDomino form. If you want to change the path you can by modifying the HTML shown below in the MyDomino form:

<script type="text/javascript" src="/domjs/dojo-1.1.1/dojo/dojo.js"></script>

This application was tested on version installed with Domino 8.5 (1.1.1) and downloaded version 1.2.3

The application was tested on:

  • Internet Explorer 7.0.5 on Windows
  • Firefox 3.0.5 for Windows
  • Firefox 3.0.5 for Macintosh

Installation:

  1. Change the ACL to match your current environment
  2. Make a non replica copy of the application on your Domino server
  3. Sign it with an appropriate administrators ID

Usage:

Browse to the application and log in as a valid directory user. It should create a myDomino document automatically for the user.
HAVE FUN!

The code is released under the Apache license. You may obtain a copy of the License at:
www.apache.org/licenses/LICENSE-2.0

Have fun with it.

Aug 132008
 

We have updated the agenda and speaker pages for Collaboration University, both in Chicago and London. It’s all done in a very “Web 2.0” fashion by combining Domino, JavaScript, JSON and the Dojo Toolkit. Dynamic link, using Dojo Tooltip, to the speaker with photo.

CU Agenda - with Carl Tyler

Go over to Collaboration University and click on Sessions and Speakers pages and roll over things, change days, play around – it’s a very cool data-driven Domino application.

Jul 292008
 

Today's tutorial: Dojo Tag Cloud Widget using dojo.data store

So I though it was time to post another Dojo widget tutorial. This time I have written a widget for displaying a tag cloud. Even though you could use it for any kind of links, the most common use is obviously tags from your blog or other website. The TagCloud widget is using dojo.data and any kind of store to display the tags. Let’s jump into some code shall we. In the bottom of this tutorial you will find links for downloading all the code.

First we need to add our core Dojo and dependencies to our JavaScript in the head of our HTML page.

[code=”xhtml”]
[/code]

You can see that we added the ItemFileReadStore, after that we have the topic of the tutorial: mydojo.TagCloud and last we added the dojo.parser so that we can create our widgets by HTML markup. You can see that the name space for my widget is mydojo.TagCloud. That means that I’ve created a folder named mydojo in the same folder as the dojo, dijit and dojox folders.
Now we add the dojo.data store and the markup HTML for our Tag Cloud widget inside our body.

[code=”xhtml”]

[/code]

You can see what it looks like in example 1.

The link above will give you the default TagCloud widget. If you look at the code, through Firebug naturally, you’ll see that it is made up of a DIV element with an unordered list, UL, inside. The list has all the tags from our dojo store with different sizes. Larger for tags with more values.

Most people want a tag cloud to look like a tag cloud though 😆 For that we need to add some style to our code inside the head tag.

[code=”css”]

[/code]

See example 2.

As you can see in the style classes above we declared a font and width inside a class named “TagCloud”. That class is always added to the div tag that the widget creates. That default class name can be changed and you can also add other classes that I will explain later. We also declared that any UL tag inside “TagCloud” will not have any margin or padding. That is because the browser automatically adds some margin and padding to unordered lists and we don’t want that for our tag cloud. Last in our style sheet we add the definition of our list item, LI. We want it to display inline and not be in a list format.

Lets add some more style to our tag cloud before I explain what attributes we can pass in to our widget. We add some more attributes to our existing classes and add two more rules.

[code=”css”]

[/code]

View it in example 3.

Tag Cloud Widget Attributes

There are a number of attributes we can pass in to change behavior and/or functionality of our widget. If we open up our widget JavaScript file we will see a number of variables at the top. You can actually change all of those by just adding attributes to our widget HTML code. They are documented inline in the code but lets look at a few of them.

[code=”javascript”]//sizeDifference: Boolean
//If we should show larger font for more tags
sizeDifference: true,

//fontMaxSize: Integer
//The size of the largest tag in percent
fontMaxSize: 200,

//fontMinSize: Integer
//The size of the smallest tag in percent
fontMinSize: 100,[/code]

So we can choose not to have a difference in size on the tags. How would we add that? Let’s look at the example below.

[code=”xhtml”]

[/code]

See what it looks like in example 4.

We have just added the sizeDifference attribute with a value of false to our widget code. Other then that it is the same code as example 3 above.

We can also choose to have bigger difference in size on tags. As you can see I’ve added the fontMaxSize attribute to our widget DIV tag.

[code=”xhtml”]

[/code]

Really large fonts in example 5.

I mentioned earlier that you can also add more style sheet classes besides the default class “TagCloud” to your widget. By adding the normal “class” attribute to our DIV tag. Classes will be appended after the “TagCloud” class. The default class can also be changed by changing the “baseClass” attribute.

What happens when the user clicks the tag? Well, since I don’t know what should happen because it depends entirely on what your tags represent and also on what kind of server the code sit on. In this blog, based on WordPress, the tag when clicked would take you to a url that look like:

[code=”javascript”]/index.php/tag/the_tag[/code]

So how do we do that? Well, one of the variables/attributes in our TagCloud widget is “clickFunction” with a default value of “tagItemClicked”. So you can add JavaScript funtion named “tagItemClicked” or pass in a new value to “clickFunction”. I’m going to show you the first way. Let’s add the following code to our JavaScript in the head of our HTML page.

[code=”javascript”]function tagItemClicked(sTag){
alert(“You clicked on ” + sTag);
}[/code]

See example 6.

If you click a tag it will alert the tag. Not very useful so let’s change it a little to make it work on my blog.
[code=”javascript”]function tagItemClicked(sTag){
location.href = ‘/index.php/tag/’ + sTag;
}[/code]

Updated to example 7.

Two other very important variables that we can change in our widget are the names of the item value names in our data.store. Default are “name”, “slug” and “count” and you can obviously keep those. Many times however you might not have the luxury over what your Ajax (XHR) call will return, or you just don’t like mine. 😥 In that case you can change them by adding the attributes “tagAttr”, “slugAttr” and “countAttr”.

Below is the JSON i’ve been calling with the ItemFileReadStore in all our examples so far.

[code=”javascript”]{items:[
{name:”ajax”, count:15},
{name:”beth”, count:2},
{name:”blog”, count:4},
{name:”calendar”, count:3},
{name:”calendar entries”, slug:”calendar-entries”, count:2},
{name:”Collaboration University”, slug:”collaboration-university”, count:14},
{name:”cu-2007″, count:11},
{name:”demo”, count:6},
{name:”dojo”, count:31},
{name:”domino”, count:20},
{name:”family”, count:9},
{name:”google”, count:2},
{name:”ibm”, count:5},
{name:”lotusphere”, count:11},
{name:”lotus quickr”, slug:”lotus-quickr”, count:27},
{name:”movies”, count:2},
{name:”podcast”, count:3},
{name:”snapps”, count:30},
{name:”templates”, count:17},
{name:”tutorial”, count:11},
{name:”widget”, count:4},
{name:”xhr”, count:3}
]}[/code]

As you can see it uses the default “name” and “count” attributes for each item. If however that would be changed to “word”, “special” and “number” everywhere…

[code=”javascript”]{items:[
{word:”ajax”, number:15},
{word:”beth”, number:2},
{word:”calendar entries”, special:”calendar-entries”, number:2},

{word:”xhr”, number:3}
]}[/code]

…we would change our HTML markup to:

[code=”xhtml”]

[/code]

What is the “slug” attribute you might ask. When a tag need a different call than it’s name you can add the slug attribute. If none is there it will just use the name attribute instead. In the example above the tag “calendar entries” has a slug of “calendar-entries” that way we can display one way but still link to the right URL.

Calling our widget with JavaScript

What if we wanted to do all this by JavaScript instead? Well Dojo widgets have this build in so all we have to do is code our HTML page a little different.

We can delete the reference to “dojo.parser” in our SCRIPT since we no longer are parsing HTML markup and we would add the following JavaScript.

[code=”javascript”]function createTagCloud() {
var oStore = new dojo.data.ItemFileReadStore({
url:”tagcloud.json”
});
var oCloudDiv = dojo.byId(‘tagCloudDiv’);
var oCloud = new mydojo.TagCloud({
store: oStore
},oCloudDiv);
}

dojo.addOnLoad(function(){
createTagCloud();
});[/code]

Then in our body we would add the following HTML.

[code=”xhtml”]

[/code]

JavaScript version example 8.

I hope you enjoyed this tutorial and I would love to read your comments. Here you can download the [download#1]. Happy coding.  🙄

Apr 252008
 

SitePen, the primary contributer to Dojo, wrote today about “FREE Top 10 and 100% FREE Dojo FREE Resource List!“. Worth noticing is the last and final one, Dojo QuickStart Guide. A new good tutorial to get up to speed with Dojo.

From SitePen’s blog by Dylan Schiemann:

  1. Dojo API Viewer. A full-featured API documentation tool, generated from source code comments and documentation. Features include simple navigation, complete listings of an object’s fields, clear definitions of a field’s type, clear ancestry paths on a field, function parameters, source and examples.
  2. The Dojo Book. An online culmination of extensive examples and detailed explanations about all things Dojo, authored by dozens of Dojo community members.
  3. The Dojo Forums. A community support resource for your learning and research efforts, without thousands of answers to Dojo questions.
  4. The #dojo IRC channel on irc.freenode.net is the place to chat live with contributors and users of Dojo.
  5. Dojo Campus. An up and coming site that contains a collection of articles and demos about Dojo, as well as a feature-explorer showing off the capabilities of Dojo.
  6. Dojo Community Blogs. Popular Dojo blogs include the official Dojo blog, Planet Dojo, SitePen blog, and Ajaxian’s Dojo category.
  7. Dojo Trac. View open and recently fixed tickets, and easily browse the Dojo source tree using Dojo’s Trac instance. Because of Dojo’s very open nature, every code commit, ticket request, and comment can be viewed through Trac.
  8. Dojo Key Links. A reviewed collection of current and up to date tutorials, demos, and articles about Dojo.
  9. Dojo Presentations. SlideShare hosts a variety of conference slides from recent Dojo presentations.
  10. SitePen’s Dojo QuickStart Guide. This is our brand new, concise, easy-to-follow tutorial for getting up to speed quickly with the Dojo Toolkit.

All these links/tips are great if you want to learn more about the Dojo Toolkit. Enjoy!

Mar 282008
 

Dojo Toolkit 1.1 was released today with huge improvements. I’ve been testing the beta of 1.1 for some time now and it’s really great.

You can read more details in the Change Log, Release Notes and Porting Guides.
Here are some of the improvements.

  • An easy to use and significantly improved Dojo API Viewer with some seriously great features, including the ability to easily find the original definition of a method that is “mixed-in”
  • A growing collection of demos, tutorials, and articles
  • A new BorderContainer Dijit, which is a much better way to handle layout-based widgets than SplitContainer and LayoutContainer
  • Significant performance improvements to dojo.query and dojo.fx
  • Support for Adobe AIR and Jaxer, and updated dojox.flash and dojox.offline APIs
  • Major improvements to Dijit infrastructure and widgets
  • All around Dijit theme improvements including the CSS structure for themes, refinements to the Tundra theme, re-introduction of the Soria theme, and the newly added Nihilo theme
  • DTL, the Django Template Language, is now available for use in widgets with dojox.dtl
  • Vector graphics animations
  • Additions to DojoX including an analytics package
  • Improvements to Dojo Data and RPC, and support for JSONPath
  • Many improvements to the build system including CSS optimization, multiple-versions of the Dojo Toolkit co-existing in the same document, and other great tools for optimizing performance

On top of these there are over 800 improvements, bug fixes and enhancements. Way to go and a big congratulations to the Dojo Toolkit team. Head over to the site and download now.

Jan 302008
 

This is the third posting going more in depth of the code I showed at my Lotusphere session BP212: The Great Code Giveaway: “Beyond Cool”. If you haven’t read the first and second article yet I recommend doing so. You find them by clicking the links. You can download the instructions, code and databases here.

What is a Grid

The Book of Dojo explains it well.

Grids are familiar in the client/server development world. Basically a grid is a kind of mini spreadsheet, commonly used to display details on master-detail forms. From HTML terms, a grid is a “super-table” with its own scrollable viewport.

The domino.view.grid that I showed in my session contains two classes. The domino.view.grid class that extends dojox.grid.Grid and the domino.view.model class that extends the dojox.grid.data.DojoData class. It also uses domino.data.ViewStore for doing the XMLHttpRequest (XHR). I wrote about the domino.data.ViewStore in the previous postings.

Instead of going through 630+ lines of code, I’m going to show how to add it to your pages or forms. First the easy one and we’ll gradually move to more complex examples.
All the examples I’m going to show require you to add a couple of lines of code to your page/form.

In the HTML Head Content you have to add a style sheet, tundraGrid.css, and the dojo.js JavaScript. The tundraGrid.css file contains all the classes needed for the Grid to display properly.

"<style type="text/css">" + @NewLine +
"@import "/dojo102/dojox/grid/_grid/tundraGrid.css";" + @NewLine +
"</style>" + @NewLine +
"<script type="text/javascript" src="/dojo102/dojo/dojo.js" djConfig="parseOnLoad: true, usePlainJson: true"></script>"

In the HTML Body Attributes we add a class of tundra.

"class="tundra""

In the JS Header we add the required JavaScript files for the domino.view.grid and the dojo.parser. This is done the very specific Dojo way. It looks like Java but is really JavaScript. Dojo does this really smart by checking if the external JS file is already loaded and available to the browser. If it is not it gets/loads it.

dojo.require("domino.view.grid");
dojo.require("dojo.parser");

All those have to be added in all my examples here. In some of the examples in the download I have added more CSS classes and more JavaScript. In the very basic example this is all we need.

Now let’s add the HTML code to our page/form.

<div dojoType="domino.view.grid" url="sessiongrid1" style="height:600px;"></div>

As you can see (click on thumbnail for larger view) this is a very basic example that just displays a 600 pixel high grid from a view called “sessiongrid1” in the same database as the page/form. If you would look at the “sessiongrid1” view you would see that these columns are in the same order and widths. If you have specified that a column is not Resizable than you can’t resize it in the Grid either.

In the next example we add an attribute of handleViewDesign=true. That will also read in font families, sizes, colors, style and justification of both column headers and bodies. It will also read in colors for Alternate rows in the view property. You also see in this example that when Display values as icons is selected on the column, it displays in the Grid. Both numbered and shared Resources work.

<div dojoType="domino.view.grid" url="sessiongrid2" handleViewDesign="true" style="height:600px;"></div>

Structure

A really neat feature of Dojo’s Grid is that you can have multi row headers. That gives us a way of displaying more data in less space, especially when we have columns with a lot of text. Again the Book of Dojo explains it for us.

In standard spreadsheet and table terminology, a cell is the basic unit of displayed data. A row is a horizontally aligned contiguous group of cells, and a column is a vertically aligned contiguous group of cells. (Wow, that makes a simple concept sound complex!)

In grid-land, there’s a distinction between rows and subrows. A subrow is what people normally think of as a row – it’s exactly one cell tall. In Grid, a row may be more than one subrow – but it is selectable as a unit.

A View is a group of contiguous logical rows with the same inner and outer “shape”… You specify this in JavaScript with an array of arrays. Each array element is an object literal. The most important property of the object is “name”, which names the column. The column name always appear as the top logical row of the grid, and unlike other rows, it doesn’t scroll up or down.

<div dojoType="domino.view.grid" url="sessiongrid3" structure="myStructure" style="height:600px;"></div>

As you can see we are using a view called “sessiongrid3”. You can find that view in the “Sessions.nsf” database in the download. In that view we have added a column with the SessionAbstract field. This field contains a lot of text and if we displayed it in the same way as the previous examples we would see only two/three documents and we would have to scroll the grid a lot. But as you can see we have added a new attribute to the div, structure="myStructure". That tells the domino.view.grid class NOT to read in the design of the view and creating the structure dynamically, but instead that we are supplying it to the grid. Below you see the code example from the page “Grid 4” inside “Sessions.nsf”.

var myViewDesign = {
cells: [
[
{
name:'Session ID',
field:"SessionID",
width:'68px',
sortAsc:true,
sortDesc:true
},
{
name:'Location',
field:"SessLocs",
width:'113px',
sortAsc:true,
sortDesc:true
},
{
name:'Begin',
field:"BeginTime",
width:"96px",
sortAsc:true,
sortDesc:true
},
{
name:'End',
field:"EndTime",
width:"96px",
sortAsc:true,
sortDesc:true
},
{
name:'Session Abstract',
field:"SessionAbstract",
width:'auto',
rowSpan: 2
}
],
[
{
name:'Title',
field:"TITLE",
colSpan: 2
},
{
name:'Speaker',
field:"Speaker",
sortAsc:true,
sortDesc:true,
formatter: withLineBreaks,
colSpan: 2
}
]
]
};
var myStructure = [ myViewDesign ];

Let’s take a look at this code. First we create an object called myViewDesign and in that object we have a property of cells which is an array containing two arrays. Each array represents it’s own row. The first array contains five column objects and the last array two column objects.

Let’s look at the first column object: Session ID. As you can see we have a few properties to this object. The first two are required. The name property is what we want it to say in the column header. The field property is the Programmatic Name of that column specified in the view column with Domino Designer. Width is the default width of the column when first displayed. sortAsc and sortDesc set to true is if we have selected that the column can be sorted ascending, descending or both.

If you look at the Session Abstract column object, you’ll see that we have a width of auto and that we added a property of rowSpan: 2. This column is going to span over 2 rows but also extend to the width of the grid.

The last two column objects are in their own array. As you can see both have a colSpan property with a value of 2. Just as you can do in a HTML table these two columns will span over two columns each, leaving only the Session Abstract column by itself. It however spans over two rows as mentioned earlier. The last thing we do is to create an array, myStructure (named so as to match the structure attribute on the div HTML tag representing the grid), and set it to our object myViewDesign. You can see the result to the right.

In this posting I have only scratched the surface of what you can do with Grids. If you download the demo databases you will see many more examples including how to open documents by clicking cells or rows. You also see examples of how to use several Grids in conjunction with each other, i.e. click on a user document in the first Grid and display his/hers sessions in the second.

If you read up on Dojo Grids on the Dojo Toolkit website you’ll see that there are many more things we can do with Grids. One is to update document data inline right there in the Grid. This doesn’t work in the domino.view.grid class yet but I’m working on it. We also need an Agent for that to work. This Grid class does not work with categorized views as of yet, but I’m working on that as well. Check back here on my blog for updates.

I hope you enjoyed this demo/tutorial and as always if you have any comments or questions please post them here.

Jan 292008
 

Today we explore two extended form widgets I used in my Lotusphere session BP212: The Great Code Giveaway: “Beyond Cool”. The first article in this series can be found here. You can download the instructions, code and databases here.

domino.form.ComboBox & domino.form.FilteringSelect

These widgets are extended from dijit.form.ComboBox and dijit.form.FilteringSelect to accommodate for the URL syntax that a Domino view requires when doing a view search. They are modern and Ajax based. You can open both by clicking the down arrow but you can also type in the field to narrow down the choices. The important part of these widgets is in the _startSearch function.

if(key != ""){
var sLetters = "abcdefghijklmnopqrstuvwxyz**";
var lastChar = key.substring(key.length-1,key.length);
var sUntilKey = "";
if(isNaN(lastChar)){
var iCharNum = sLetters.indexOf(lastChar);
sUntilKey = key.substring(0,key.length-1) + sLetters.substring(iCharNum+1,iCharNum+2);
}else{
sUntilKey = key.substring(0,key.length-1) + (parseInt(lastChar)+1);
}
query["StartKey"] = key;
query["UntilKey"] = sUntilKey;
}else{
query["StartKey"] = null;
query["UntilKey"] = null;
}

What we do here is creating the URL syntax for a Domino view search that requires the &StartKey= and &UntilKey= arguments to find the document(s) the user is searching for.

From Domino Designer 8 Help:

StartKey=string
Where string is a key to a document in sorted view. The view displays at that document. In cases where there is no match for the StartKey, the next document is returned. So, for example, if the StartKey is “A” and there are no documents that begin with “A”, StartKey returns the first document that begins with “B.”

UntilKey=string
UntilKey is only valid when used with StartKey. It allows you to display the range of view entries beginning with the document specified by StartKey until the document specified by UntilKey. For example, &StartKey=A&UntilKey=B would give you all the entries that start with A. Use the &Count keyword to further limit the number of entries returned within any given range.

How to add to them to your form

Both these widgets are very easy to add to your forms. Both require the domino.data.ViewStore discussed in the previous article so you start by adding that.

<div dojoType="domino.data.ViewStore" jsId="DominoStore" url="../sessions.nsf/sessionlookup"></div>

Here we add a div tag with dojoType of domino.data.ViewStore, we give it a jsId of DominoStore and the url is pointing to a database and view. In this case a database called sessions.nsf parallel to the current database and a view named sessionlookup.

We add a Notes field to our form and make it type Dialog list. In the HTML Attributes of the field we add the following:

"dojoType="domino.form.ComboBox" store="DominoStore" searchAttr="IDTitle" pageSize="10" autoComplete="false""

The store attribute is the same as the jsId attribute of our domino.data.ViewStore above. The pageSize attribute is the number of documents we get/show at a time and the autoComplete attribute is for making the top search value auto complete the field. Try if for yourself by setting it to true.

I left the searchAttr attribute for last because it need some explaining. As you know we are using a store to get the values for the field.

If we open up the view sessionlookup in the database sessions.nsf in Domino Designer we see that the view has two columns. If you look at the Programmatic Name for the first column you’ll see that it is IDTitle. This column is what we want values from so we set the searchAttr to IDTitle. The value saved by a domino.form.ComboBox is the same as what you see.

The difference between a domino.form.ComboBox field and a domino.form.FilteringSelect field is that the latter has an onChange attribute and that the value of the field is always the identifier of the store it is using. What is an identifier you ask? Well, all data stores has a unique identifier. In some cases that is just an incrementing number starting at zero, but in the domino.data.ViewStore I created I used the NoteID. Why not the UNID? Because a document can actually exist several times in the same view.

So in a domino.form.FilteringSelect field representing all speakers I have the following attributes.

"dojoType="domino.form.FilteringSelect" store="SpeakerStore" searchAttr="Name" pageSize="10" autoComplete="false" onChange="setMentor(arguments);""

You can see this field in the “Mentor Selection” form in the “Mentors.nsf” database. It is part of the download. We now need the setMentor function.

function setMentor(arguments){
var identityRequest = {
identity: arguments[0],
onItem: function(item){
var sEmail = SpeakerStore.getValue(item, "Email");
alert(sEmail);
},
onError: function(){
console.error("Fetch failed.");
}
};
SpeakerStore.fetchItemByIdentity(identityRequest);
}

A version of this function can be found in the “index” page inside the “Registration.nsf” database. In this function we first create an object, identityRequest, and set the property identity to the first value in the passed in arguments array by setting identity: arguments[0]. We also have an onItem property. This is the function we call when we have retrieved a value. onError is being called if an error occurs. In the bottom of the function we do the call to the store and pass in our identityRequest object. SpeakerStore.fetchItemByIdentity(identityRequest); In this case we only alert the email address of the user we selected but if you look at the same function in the “index” page mentioned above you’ll see that we call another function to go get the profile from greenhouse.lotus.com for that email.

If you want to dig deeper in all possible attributes that a ComboBox and a FilteringSelect can change see the dijit.form.ComboBox and the dijit.form.FilteringSelect JavaScript files. Remember that in Dojo the name space is done by the periods you see in the names above. So in the folder dijit you find a folder called form where you’ll find the files ComboBox.js and FilteringSelect.js.

I hope this tutorial together with my code examples will clarify these two widgets for you. If not please comment below and I will try to explain further.

Jan 282008
 

At Lotusphere in my session BP212: The Great Code Giveaway: “Beyond Cool” I showed a couple of widgets and a Grid based on the Dojo Toolkit. I’m going to show you how I did those in a couple of articles the next few days. Instead of going through the code line for line I’m just going to highlight some of the changed variables and code. All the code for these examples and demos can be found here.

Extending Dojo code

One of the really powerful things you can do with a large toolkit like Dojo is that you can extend a widget/class instead of having to change the underlying code in the toolkit itself. Instead of having to write all the code for your class you just extend an existing class and change the functions/variables you need to. You can also add your own variables and functions. Extending Dojo code is really easy. You create your own JavaScript file and “require” the existing class/widget.

dojo.provide("my.new.Widget");
dojo.require("dijit.widgetToExtend");
dojo.declare("my.new.Widget", dijit.widgetToExtend, {
variablesToChange: "myNewValue",
functionToChange1: function(arg1){
//New code
},
functionToChange2: function(arg1, arg2){
//New code
}
}

In the example above we have extended a widget class called “dijit.widgetToExtend”. You would copy this JavaScript in a file named Widget.js inside a folder structure of “/my/new/” located parallel to the dijit, dojo and dojox folders. There are other places you can put your code but this is the simplest.

Using dojo.data

What is dojo.data?
Dojo.data is a uniform data access layer that removes the concepts of database drivers and unique data formats. All data is represented as an item or as an attribute of an item. With such a representation, data can be accessed in a standard fashion.

Ultimately, the goal of dojo.data is to provide a flexible set of APIs as interfaces that datastores can be written to conform to. Stores that conform to the standard interfaces should then be able to be used in a wide variety of applications, widgets, and so on interchangeably. In essence, the API hides the specific structure of the data, be it in JSON, XML, CSV, or some other data format, and provides one way to access items and attributes of items consistently.

The great thing about dojo.data stores are that they use a predefined way of getting/setting/updating code in the store. Whoever writes code for widgets that use stores does not have care about where the underlying data is located. It could come from a MySQL database, a XML file on the file system or now a Domino view.

domino.data.ViewStore

I’ve added three variables to this class. You see them below with their default value.

parseTypes: false,
dateFormatLength: "short",
handleAsJSON: true,

parseTypes: Parses all view data into it’s correct format. Numbers become floats, dates become locale dates. Locale dates are dates that show up in the format that the current browser language want to show them.
dateFormatLength: If parseType is true, then show the date in this “length”. Can be long, short, medium or full.
handleAsJSON: Default is that all data from the Domino view is returned with JSON using the “&OutputFormat=JSON”. If you set this to false all data is retrieved using XML instead. JSON was not implemented on the Domino server until version 7.0.2 so if you use a server prior to this you need to set this variable to false.

There are five functions I want to mention briefly.

_filterResponse: Used for parsing view data in JSON format to the required format for a store.
_filterXMLResponse: Used for parsing view data in XML format to the required format for a store.
_returnColumnValue: Helper function to get the value for a specific object. Used from _filterResponse.
_returnEntryValue: Helper function to get the value for a specific XML node. Used from _filterXMLResponse.
_returnDateTime: Helper function to format the Domino date string to a dojo.date.locale.

That’s it for this time. Next time we’ll look at domino.form.ComboBox and domino.form.FilteringSelect that both use the domino.data.ViewStore. Happy coding.

Jan 252008
 
Lotusphere 2008 OGS
Photo by Aidy Spender

Rob, Jerald, Troy and I are back home at the office after a very exciting week at Lotusphere 2008. As always I wish I could have attended more sessions but with 5 sessions this year I just ran out of time.

Lotusphere 2008 Boat Race
Photo by Macian

Monday Carl Tyler and I had our heat in the annual Lotusphere Boat Race. Carl could not attend the final on Thursday because of his early flight back home but Troy Reimer from SNAPPS filled in and we finished in 3rd place.

Tuesday morning Troy and I presented BP205 – Extending and Customizing Templates for IBM Lotus Quickr. It was very well attended and even needed a overflow room. The presentation and demo files can be downloaded here.

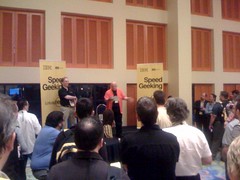
Lotusphere 2008 Speed Geeking
Photo by RLB865

Tuesday night Rob Novak and I presented a cut down version of that session (in 5 minutes) 12 times at the Speed Geeking event.

Wednesday after lunch Troy and I had our very first Hands-On-Lab at Lotusphere: HND305 – Building Custom Themes for IBM Lotus Quickr and it was repeated the same afternoon by Jerald and Troy. A full room in the morning and almost full in the repeat in the afternoon tells me that we need to do this lab next year as well. Session materials can be downloaded here.

Wednesday afternoon Rob and I presented our session: BP212 – The Great Code Giveaway: “Beyond Cool”. This was the third year we presented a “Code Giveaway” session and it was very well attended. We went over 12 demos in 1 hour and it was a lot of fun. Session materials can be downloaded here.

Wednesday night party was a blast at Universal Studios – Islands of Adventure. Jerald, Troy and I made it to a few of the rides.

Lotusphere 2008 GuruPalooza
Photo by elesar1

Thursday morning Rob and I repeated our BP212 – The Great Code Giveaway: “Beyond Cool” session at 10 AM. To see the room almost full that early the last day of the conference was very exciting.

Thursday afternoon Rob and I also sat on stage for the annual “GuruPalooza” session.

It was a great Lotusphere and I really hope to be at Lotusphere 2009. I’ll see you there.

Jan 032008
 

First of all, Happy New Year. I hope 2008 will bring you good fortune.

Here at SNAPPS I’ve been extremely busy preparing for my sessions at Lotusphere. I’ve already posted about them here. If you have a chance to attend Lotusphere this year, and are using Domino, I think this will be the most exciting one in years. If you see me in the halls, come up and introduce yourself. I love meeting new people.

December ended very hectic with my youngest son Erik’s first birthday and later Christmas with in-laws visiting. A great time with family and lots of great food.

I know a lot of you are waiting for my update of the Dojo Calendar to work with the Dojo Toolkit 1.0 and beyond. I’m working hard to have it out there for you soon. I’ve been very busy with “real” work, but I have a working copy so all I can say is soon.

Speaking of the Dojo Calendar. I have decided to make it work with dojo.data. To make the calendar get information from many different resources is important and the Dojo data stores make that more convenient using the same API no matter what the source is.

I hope I see you at Lotusphere.